One of the things I have been studying in the past few days is how the networking stack works in our lives nowadays:
- What are the standard protocols?
- How these protocols work?
- How everything are integrated?
These questions guided me towards a “playing around” exercise: build a simple HTTP server and follow all the steps that a simple data packet goes throughout the networking stack (top-down approach).
Some tooling necessary to either allow us to send a packet through the stack and also to follow its steps downwards. Each tool are going to be presented as required.
Application layer
The application layer is basically where the user start requesting things in order to get a result or a reply from something/one. Any action performed by the user in a web browser or in a video streaming application ends up in a packet being sent to a server or to another user somewhere in the internet.
That is where we are going to start our journey: right in the top of the networking stack.
Our HTTP server
I’m going to use the Perl language to build our HTTP server. I won’t get in details around the code nor how the server is implemented underneath, although I might present some information about the protocol itself.
The following code will be saved as http-server.pl:
use warnings;
use strict;

use Net::Async::HTTP::Server;
use IO::Async::Loop;
use HTTP::Response;
use HTTP::Status;

sub handle_request {
    my $self = shift;
    my ($req) = @_;
    my $resp = HTTP::Response->new(HTTP::Status::HTTP_OK);

    $resp->add_content("You have requested: ".$req->path."\n");
    $resp->content_type("text/plain");
    $resp->content_length(length $resp->content);
    $req->respond($resp);
}

my $async_loop = IO::Async::Loop->new();
my $http_server = Net::Async::HTTP::Server->new(
    on_request => \&handle_request
);

$async_loop->add($http_server);
$http_server->listen(
    addr => {
        family => "inet",
        socktype => "stream",
        port => 8080
    },
)->get();

print("Listening...\n");
$async_loop->run();
With that code running you are already ready to receive requests:
$ perl http-server.pl
Listening...
And in another shell:
$ curl http://localhost:8080
You have requested: /
Overview on HTTP protocol (RFC 2616)
Being able to send and receive requests is the first step we need to achieve to start analysing the stack. Now we need to get our hands somewhat dirty within the HTTP protocol itself to gather some useful information for the rest of our journey.
HTTP workflow runs basically around two basic concepts: requests and responses for those requests. Although it might seems pretty simple, the protocol is a pretty extensible one, holding a lot of headers that may get included within each request and/or response. It is out of the scope of this article to get into details about HTTP protocol and, because of that, we are going to present only an overview of these concepts.
Requests
An example of HTTP request is:
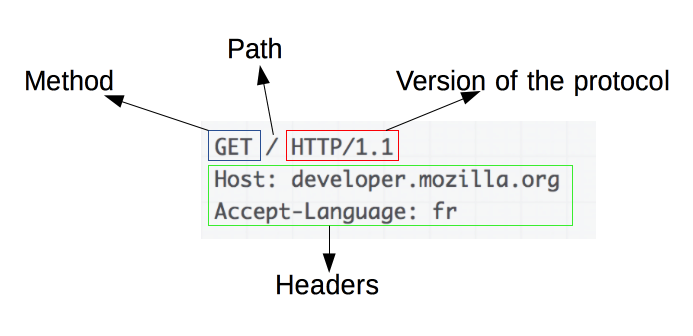
Which is composed of four main parts:
- method: a verb that defines the operation the user wish to perform to the server. Although usually it is limited to GET and POST methods to, respectively, fetch and set operations, it is also possible to have other ones for different purposes, i.e. OPTIONS;
- path: the path to which the user wants to fetch information:
- version: HTTP protocol version;
- headers: additional information to the server. It might inform different ways the server could handle the request;
- body: in case the method chosen is POST a body may appear under the headers.
Using our brand new server we can check the request with:
$ curl -v http://127.0.0.1:8080
...
> GET / HTTP/1.1
> Host: 127.0.0.1:8080
> User-Agent: curl/7.61.1
> Accept: */*
>
...
Some other informations are printed out with this command, but the request is only these four lines.
Responses
Now, a response example is:
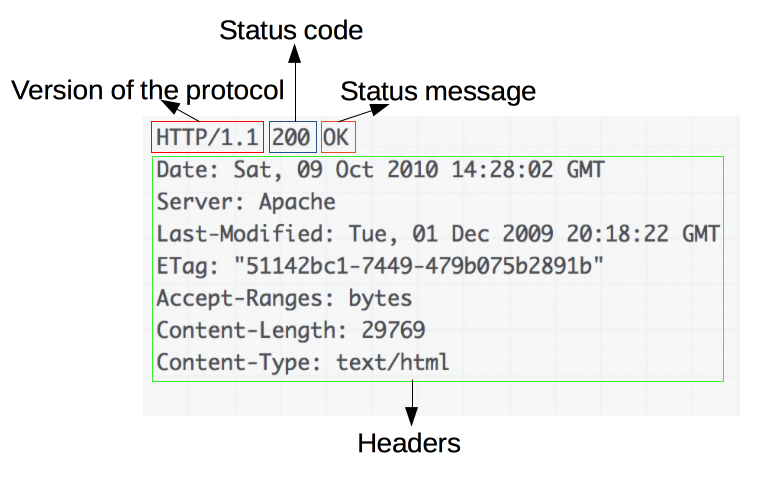
Which is composed by the following fields:
- version: HTTP protocol version;
- status: an integer code that represents the status of the request;
- message: a message that shortly describes the status code;
- headers: and more headers that presents additional information that may be used by the user for any reason;
- body: the response content per se.
The same command used to check request headers we can use to check the response’s ones:
$ curl -v http://127.0.0.1:8080
...
< HTTP/1.1 200 OK
< Date: Wed, 22 May 2019 04:06:21 GMT
< Content-Length: 22
< Content-Type: text/plain; charset=utf-8
<
You have requested: /
...
Stack analysis
For this exercise in particular we are interested in a couple of informations that are present in HTTP packet: being them the Date, that we are planning to use as a timestamp as checking mechanism later on, and Content-Length which will help us to understand some lower level protocols behaviors in certain situations.
You can keep listening your requests and responses in real-time with a tool called tcpflow which keep track of all TCP connections being performed through one of your network interfaces:
# tcpflow -c -i <interface>
While in the another shell (or even through a normal browser) you keep sending requests to your server.
# tcpflow -c -i lo
...
::1.40138-::1.08080: GET / HTTP/1.1
Host: 127.0.0.1:8080
User-Agent: curl/7.61.1
Accept: */*


::1.08080-::1.40138: HTTP/1.1 200 OK
Date: Wed, 22 May 2019 04:32:35 GMT
Content-Length: 22
Content-Type: text/plain; charset=utf-8

You have requested: /
Keep in mind that HTTP is an application protocol and has no clue about IP addresses. I mean, although it has the Host header it is used to pass the information to an underlying protocol known as Internet Protocol (IP), which will actively work with it.
When the time is come new requests are going to happen and possible greater messages as responses bodies as well, but we guarantee that nothing will change in our server, no magic will be added, only a few characters to the response content.
Just to finish this first part of the series I think it is worth to mention that: so far I have used only IP addresses to refer to my localhost, 127.0.0.1, and it happened because I was avoiding to mix information of two application layer protocols, HTTP and DNS.
In short, DNS is the Domain Name System which is a mechanism to translate server’s names to numerical addresses (IP), since the machines only know about the numbers, while names are interesting only to humans.
The idea here is not to discuss how neither DNS and HTTP works internally, but how the network stack is bundled together. Because of that I’m stopping here and leaving a link to the next series part.